Friday, November 4, 2011

Halloween 2011

Dressed up as Inspector Gadget this year - with functional gadget copter! Diana was sick this year and it was raining on halloween, but I still entered in the work costume contest. I managed to pull out a win over some other really good costumes!

Here is our team jack-o-lantern. First pumpkin I've carved since I can remember. Definitely going to get that tradition going again!

Monday, October 24, 2011

Rifle Repair

It was a 1938 Mossberg 44M(b); a WWII training rifle. It belonged to my grandfather but in my youth I got to shoot it a lot. Being 73 years old, it wasn't in the best aesthetic condition, but mechanically it worked great (the rifle not grand-dad!). I recently had the opportunity to 'restore' the rifle. I use the term loosely because I didn't do much other than clean it up, paint a few parts, do some repair, and re-stain the wood.

In this shot you can see a lot of the scratches in the wood and the general condition of the rifle.

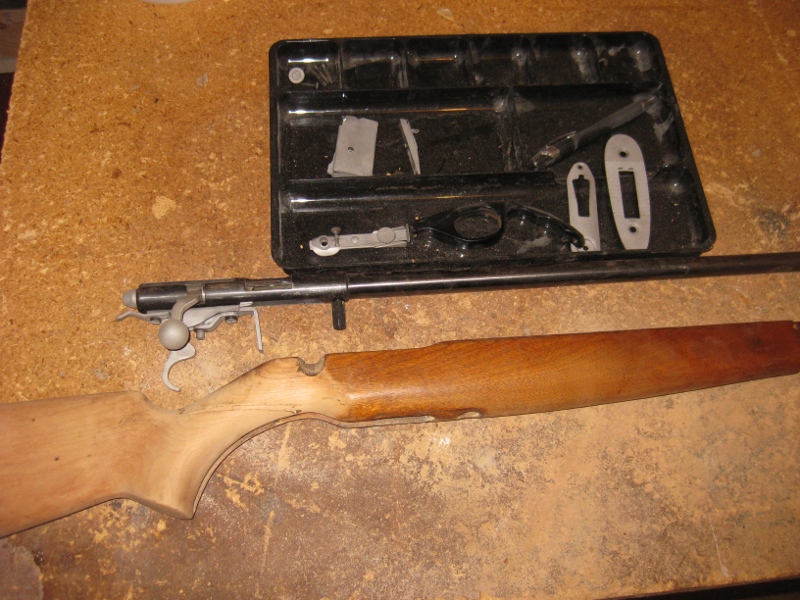
In this one you can see the surface rust on the metal pretty clearly as well as a crack in the stock. This crack goes completely through. I had a previous repair that held it in place for at least the last 20 years which is about when I first saw the rifle. But the glue was starting to rot and it was pivoting around the bolt that held it together.

On the bottom side here, you can again see the crack in the stock as well as the crack in the trigger guard which is probably just from expansion and shrinkage over age of the plastic.

So, I started by taking everything apart and documenting how it all goes together. Then I sanded down the finish on the wood and tried to get out all the scratches. I also split the stock on the crack and reglued everything with some leftover titebond wood glue I had lying around. I knew from building guitars that titebond holds excellently under stressful conditions.

I took all the metal parts to Tom's and sandblasted the rust off. Talk about saving time vs sanding. I was able to get the rust off in about 20 minutes. This would have taken days to manually sand in all the cracks and crevices. The only drawback was some grit in some of the moving parts that had to be cleaned out.

Here it is reassembled. I tried to repair the trigger guard because that is the only place on the rifle that has the date (1938). But it had shrunk so much that it didn't fit correctly anymore - hence the crack. I found a website that sales old Mossberg parts. http://www.havlinsales.com/. From him I ordered a new 15 round mag, and a new poly trigger guard. The saying 'they didn't make em like they used to' came to mind. The new trigger guard wasn't an exact match and I had to trim it and shim it a bit to get it to fit without a gap between the guard and the wood.

I pretty much left the barrel as it was. I sanded down a little of the patina using a wet sanding technique and wd-40 with 2000 grit sandpaper. Then I coated it with a few coats of clear. This way it still looks original but has a protective coat. I tried to restore the leather strap, but my leather products couldn't do much to revive that.

This was definitely a fun project. I always enjoy learning how something new works and I LOVE mechanical devices (as opposed to electrical), so taking this apart and reassembling it was a great learning experience.

Wednesday, July 13, 2011

Working on cars - hottest day of the summer

With our trip to the beach coming up, it was time to tune up the cars a little bit. This was my last chance to get to it and unfortunately, was a 102 degree day. According to the weather man it felt 112 with the heat index.

First up was the ol' Honda. First up was the usual oil/oil filter/air filter. Way overdue for most all of these. I found out that the bucket I just bought for oil changes has a split in the bottom. A pretty awesome discovery with 3 gallons of oil dispatched to that bucket. After sorting that out it was time to turn my attention to the desperately corroded battery terminals. So corroded that I had to use the shop vac to contain the mess - and I was unable to get the positive terminal off. I was able to remove the negative terminal though and give it a thorough cleaning. Upon reconnecting the battery - the aftermarket car alarm was kind enough to go off in my ear. I Pulled the horn fuse and started fishing for the cut off sequence. I looked briefly for a valet switch and didn't find one so I tried the usual stuff. Lock the door, unlock the door, start the car, press this press that. I eventually did find a tiny valet switch and was able to get the alarm back in order. Then I wrote down what to do on the manual cover so this doesn't happen again. (read: this isn't the first time)

After that the cobra. It appears to be suffering from a small oil leak, and after the effort to get the car lifted, I discovered that there appears to be a small metal gasket between the engine and the transmission bellhousing that has been bent. This is the lowest point on the car, and I must have scuffed it on a speed bump or something. I might try stuffing it full of RTV because UGH. I might extract an opinion or two from fellow car folks before doing anything though.

Last was the truck - due for a tire rotation. Driver side - no problems. Passenger side - broke a 3/4in socket, and then with the replacement broke my 3/4 to 1/2in adapter. I was able to find a suitable replacement in with my air tools but man - those lugs are hard to get off!

Overall mission success...I just hope Diana's battery doesn't die because it's pretty much fused to the wiring!

Tuesday, April 26, 2011

Thursday, April 14, 2011

Saturday, April 9, 2011

Screen Room Phase II

The floor is finished, we've got some wall posts and some ceiling beams. We've passed all the critical inspections and surveys.

Wednesday, April 6, 2011

Roadster Top continued

We've made some good progress on the top. It's all uniform now, meaning no more foam showing. Unfortunately we've added so much spackle to build it up, it's currently to heavy and brittle to remove.
Our idea for the next phase, is to get the rough shape more symmetrical and basically almost a finished shape. Then we'll put a few coats of fiberglass on it and that will give it the strength we need to be able to lift it off and work the edges. From there we will decide if we'll keep working that plug, or use the glass as a mold and create a more reasonable plug to work on.

Friday, March 25, 2011

Roadster Top Phase II


We basically decided we had tapped out the potential of the foam - it was a great base, but now we need something that we can build up as well as cut down. So for our next phase of build-up, we're going with a quick set spackle.

Tuesday, March 22, 2011

Screen Room Phase I

This is after I busted down the banisters, and Don and Ron dug the footer holes.

After extending the current deck northward 4 feet and added the frame for the new deck.

'Nother view.

Roadster Top Phase I

It started with a few sheets of 2" foam.

These were assembled to create the first shell.

These were shaved down to a rough shape, then built back up with more foam then shaved back down.

More to come...

Monday, March 14, 2011

Current Projects

I was planning to post about my current projects with lots of before/after/during photos, but I'm stuck at the car dealership with some work being done on the ol' truck so I have a good opportunity to write about it now.

First there is the hard top for the cobra.  It's coming along, slowly but surely.  The idea is to start with a mold of styrofoam and to build up from there using bondo and fiberglass until a final mold plug is ready.  I'm still in the foam stages but it's coming along.  Started out with one 2" layer of foam and carved that down to shape.  We ran out of material though, so I had to build it back up with another layer of foam.  That is where we are now.

Next project up is the screen room.  We got a greenlight from the homeowners assoc so I spent a few minutes this weekend demolishing the old deck.  Well, not the whole thing, but the handrails and anything that isn't going to be part of the new room.  I also cut down a tree that I wanted down before the deck went up.  I had to use an axe, but was able to get it to fall right where I wanted.  Had to dig up a few bushes and plants as well.

The last project is the yard.  I borrowed some spike shoes from Tony and thatched and mowed the yard with them on.  They rubbed a horrible blister on my heel, but I got good coverage on the yard!  Then I planted some grass.  It's a bit early for planting grass, but I want to lay down weed & feed as early as possible so I can kill the weeds before they choke out all the grass.  Thinking about planting a cherry tree in the near future.

So it was a pretty busy weekend and I'm pretty worn out!

Thursday, January 13, 2011

Fixing up the truck

The trusty ol' Ford Anger has been collecting quite a list of things to repair/replace. I had to decide whether to work down this list, or replace the truck and I decided, it's time I get going on that list. Here it is from things to do through things I have finished.

  • New Clutch (more specifically a new throw out bearing)
  • New brake drums and shoes for the rear
  • Some burned out Dash bulbs
  • Interior dome light - now that the door ajar sensor appears to be working, I should hook this back up.
  • EGR system repair - I recently replaced a pressure sensor and sprayed some brake parts cleaner up in there. Seems to have fixed it.
  • O2 reading error codes - I got tired of these and replaced all 4 O2 sensors.
  • Broken armrest/console and seatbelt latch - I found a junkyard in IL that had these parts in stock. They are in the mail! I broke a seat bolt getting the seat out - I'll need to fix that before being 'done'
  • Burned out high beams - Replaced both headlight bulbs
So yes I have the difficult/expensive things left to do, but I've made enough progress on the other stuff now that I feel like it's worth it.  It might even be kinda nice when I'm done!  I'll probably replace some worn out suspension components and put some properly sized tires on it eventually, but I want to avoid this truck being my project car :-P